Poor wood flooring installation is one of the most expensive mistakes a homeowner can make. Boards that look stunning on day one can start squeaking, warping, or lifting within months if the groundwork is wrong. Flooring failures are frequently traced back to skipped preparation steps and poor technique rather than inferior materials. Whether you are planning a solid oak floor in a Glasgow tenement or engineered boards in a new-build, this guide covers the most common errors and exactly how to avoid them.
Key Takeaways
| Point | Details |
|---|---|
| Subfloor prep matters | Neglecting the base leads to failures no matter the top material. |
| Acclimatisation is crucial | Boards need time to adjust to room conditions to prevent gaps and warping. |
| Right fixings prevent squeaks | Correct nails and adhesives keep your floor solid and silent. |
| Maintenance extends lifespan | Basic aftercare steps can add years to your wooden floor’s service life. |
Skipping subfloor preparation: the hidden risk
The subfloor is the foundation everything else depends on. Skip its preparation and even the most expensive boards will fail prematurely. It is the single most overlooked stage in DIY installations, yet it accounts for a disproportionate share of long-term problems.
Common subfloor mistakes include:
- Uneven surfaces that cause boards to rock, flex, and eventually squeak underfoot
- Excess moisture trapped beneath the floor, leading to swelling, cupping, or mould
- Dust, debris, or old adhesive residue left behind, creating hollow spots and uneven wear
- Failing to check for structural movement in older Glasgow tenement flats where joists may have shifted
Up to 25% of building damages are linked to inadequate preparation and installation, with flooring failures frequently tied to poor subfloor condition. That statistic should give any homeowner pause before they rush ahead.
The importance of expert advice becomes clear at this stage. Professionals assess subfloor condition before a single board is touched, something many DIY guides gloss over entirely.
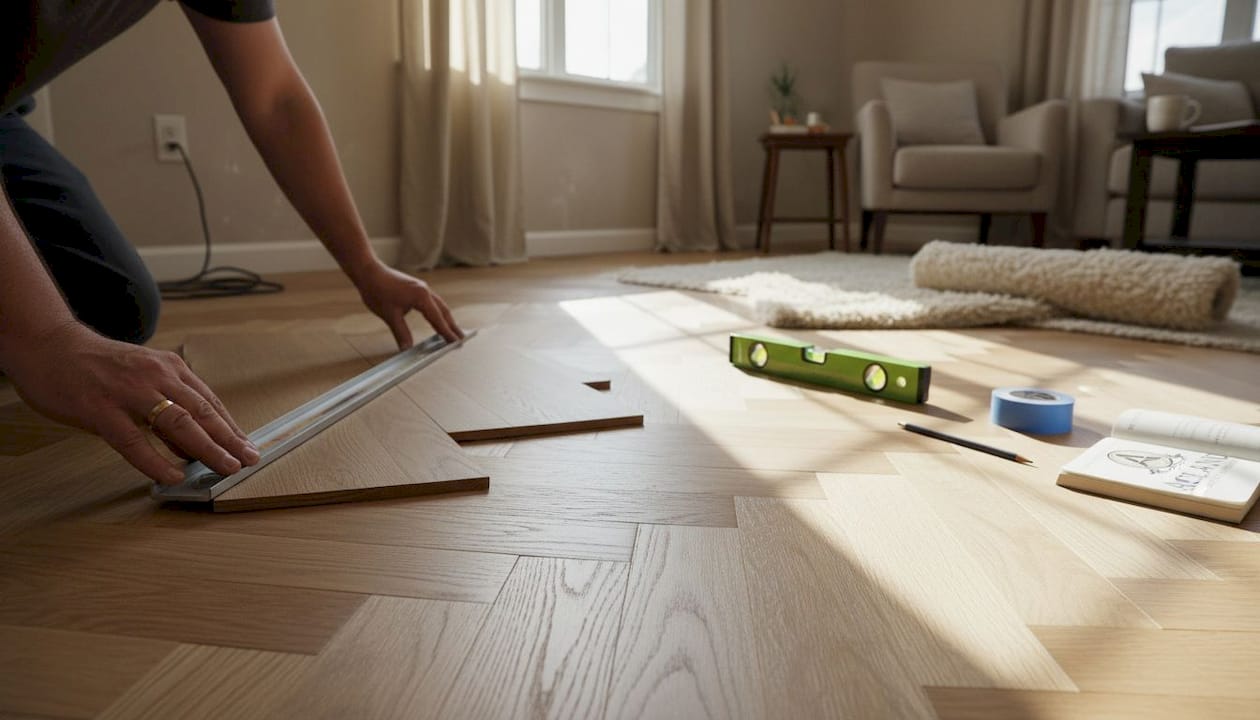
Pro Tip: Use a long straight edge to check for dips or ridges greater than 3mm over a 1.8 metre span. Pair this with a calibrated moisture meter. Readings above 12% in a timber subfloor typically require treatment before any wood flooring is laid. Our wood flooring preparation guide explains acceptable tolerances in more detail.
Cutting corners with acclimatisation and layout
Once the base is settled, the next critical and often skipped stage is acclimatisation and planning. Wood is a living material. It expands and contracts in response to the humidity and temperature of the room it sits in. Ignore this and the floor will move whether you want it to or not.
Here is how to acclimatise boards correctly:
- Bring the flooring into the room where it will be installed, not a garage or hallway
- Stack boards loosely to allow air to circulate around each layer
- Leave them for a minimum of 48 hours, though 72 hours is better in Scotland’s variable climate
- Keep windows and doors in their normal position during this period to reflect real living conditions
- Check the room’s humidity sits between 40% and 60% relative humidity before laying begins
Skipping acclimatisation is like fitting a door frame in summer and wondering why it sticks in winter. The wood was never given the chance to settle before it was locked in place.
Poor preparation and skipping installation steps account for a significant share of flooring failures reported in building studies. Layout planning matters just as much. Always dry-lay a few rows first to check the pattern works across the room. For more complex patterns, planning herringbone layouts requires a centre-line approach to avoid awkward slivers at the walls.
Incorrect use of fasteners and adhesives
Proper boards and layout will not matter if they do not stay put. The wrong fixings or adhesive create loose boards, hollow spots, and persistent squeaks that no amount of cleaning will fix.
| Fixing method | Best suited for | Common error |
|---|---|---|
| Secret nailing | Solid wood on timber subfloor | Wrong angle or spacing, causing splits |
| Stapling | Engineered boards on ply | Staples too shallow, boards lift over time |
| Full adhesive bond | Engineered on concrete | Incompatible adhesive, poor bond strength |
| Floating (click) | Engineered on most subfloors | Over-gluing joints, restricting natural movement |
Incorrect nailing, stapling, or adhesive use causes loose boards and squeaks that worsen over time. Nails driven at the wrong angle split the tongue on the board. Adhesive applied too thinly or to the wrong substrate simply will not bond under foot traffic.
Pro Tip: Always check the adhesive manufacturer’s data sheet against your specific flooring product before purchasing. Not all wood-compatible adhesives work across both solid and engineered floor fitting methods. Getting this wrong is an expensive lesson.
Spacing matters too. Nails or staples placed too far apart leave sections of board unsupported, which flex and eventually loosen. Follow the manufacturer’s fixing schedule precisely.
Neglecting finishing touches and routine maintenance
Once installed, how a floor is finished and cared for determines its beauty and lifespan. Many homeowners invest heavily in the boards themselves, then cut corners on the final steps.
Key finishing and aftercare steps to follow:
- Fill expansion gaps at walls with flexible sealant, not rigid filler, to allow natural movement
- Fit skirting boards or beading to cover the perimeter gap and protect board edges from knocks
- Apply the correct finish whether oil, lacquer, or wax, matched to the wood species and usage level
- Use felt pads under furniture legs immediately after installation
- Place doormats at all entry points to reduce grit, which acts like sandpaper on the surface
| Maintenance frequency | Expected floor lifespan |
|---|---|
| Daily sweeping, weekly damp mop | 30 to 40 years |
| Weekly sweep only | 20 to 25 years |
| Occasional cleaning | 10 to 15 years |
| Rarely cleaned | Under 10 years |
Flooring failures linked to poor maintenance are entirely preventable. A well-maintained floor can outlast the building it sits in. Browse our completed flooring projects to see what proper finishing looks like in practice.
Why expert installation pays off in the long run
After years working in Glasgow’s flooring trade, one truth stands out: the mistakes that cost homeowners the most are never the obvious ones. Nobody forgets to lay the boards. What gets missed is the moisture reading taken on a damp November morning, or the subfloor flex that only shows under a loaded bookcase.
DIY installation can work for straightforward rooms with forgiving subfloors. But wood flooring punishes small errors compoundingly. One skipped step creates three problems six months later. Experienced installers do not just follow a checklist; they read the room, the subfloor, and the conditions in a way that no manual fully captures. That is why expert flooring advice is not a luxury. For most homes, it is the difference between a floor that lasts decades and one that needs replacing in five years.
Get flawless flooring with local professionals
If this guide has shown anything, it is that beautiful wood floors are built on careful decisions made well before the first board goes down.

Acland Wood Flooring supplies and installs professional wood flooring in Glasgow with the kind of attention to detail that prevents every mistake covered above. Whether you are considering solid wood flooring for a traditional finish or engineered wood flooring installers for a more versatile solution, our team offers honest advice and no-obligation quotes. Get in touch to discuss your project.
Frequently asked questions
How can I tell if my subfloor is ready for wood flooring?
Your subfloor should be dry, level, and free from dust or debris before installation. Subfloor unevenness is a leading cause of squeaks and instability in new floors.
What happens if boards aren’t acclimatised properly?
Boards may shrink or expand after installation, causing gaps or buckling. Correct acclimatisation prevents these expansion and contraction cracks from forming.
Why does my new floor squeak when walked on?
Squeaks usually come from incorrect nailing or stapling, or poorly matched adhesives. Incorrect fixing methods allow boards to move fractionally with each step, creating that familiar noise.
How often should I clean and treat my wood floor?
Sweep regularly, damp mop weekly, and consider re-oiling or sealing annually for best protection. Neglected care significantly shortens floor life and voids many manufacturer warranties.